E21 | Running Power to a Shed | Ask This Old House
Season 24 Episode 21 | 23m 42sVideo has Closed Captions
Running power to an outbuilding; basic tools for painting a room; compost versus disposal
Heath Eastman shows a homeowner how to run underground power from his house to a new shed, including trenching, conduit, wiring, and installing a panel. Mauro Henrique explains the basic tools and supplies needed to paint a room. Then, Kevin OConnor hosts a friendly kitchen quiz, testing Richard Trethewey and Jenn Nawada on which food scraps belong in the garbage disposal and which in compost.
Problems playing video? | Closed Captioning Feedback
Problems playing video? | Closed Captioning Feedback
Funding for Ask This Old House is provided by The Home Depot, Renewal By Andersen, and ChipDrop.
Support provided by:


E21 | Running Power to a Shed | Ask This Old House
Season 24 Episode 21 | 23m 42sVideo has Closed Captions
Heath Eastman shows a homeowner how to run underground power from his house to a new shed, including trenching, conduit, wiring, and installing a panel. Mauro Henrique explains the basic tools and supplies needed to paint a room. Then, Kevin OConnor hosts a friendly kitchen quiz, testing Richard Trethewey and Jenn Nawada on which food scraps belong in the garbage disposal and which in compost.
Problems playing video? | Closed Captioning Feedback
How to Watch Ask This Old House
Ask This Old House is available to stream on pbs.org and the free PBS App, available on iPhone, Apple TV, Android TV, Android smartphones, Amazon Fire TV, Amazon Fire Tablet, Roku, Samsung Smart TV, LG TV, and Vizio.
Keep Exploring

This Old House Insider Newsletter
Get This Old House exclusive stories, tips, and behind-the-scenes information delivered right to your inbox every month.Providing Support for PBS.org
Learn Moreabout PBS online sponsorship♪ Kevin: On "Ask This Old House," our experts travel across the country to answer questions about your house.
♪ Today, Heath helps a homeowner run power to their new shed.
Jeff: It's incredible.
Kevin: Then Mauro shares some of his favorite painting accessories.
Mauro: Do your cutting.
Kevin: A little magnetic.
Beautiful.
And Jenn and Richard play a fun game of Disposal or Compost.
And it is... Richard: Chicken.
Kevin: On "Ask This Old House."
♪ Heath: Hi, Jeff.
Jeff: Yeah.
Heath?
Heath: Nice to meet you.
Jeff: You as well.
Heath: So I saw that you wrote in about a shed and getting some power out there.
Jeff: I did.
We put that shed up not that long ago, and I'd really like to get power out to it.
And I'd like to know how.
Heath: Well, let's go take a look at it and see what you have in mind for using it.
Jeff: Great.
This is Newton, by the way.
Heath: Hi, Newton.
Oh, wow.
This is a great shed, Jeff.
Jeff: Yeah it is.
It's nice.
It's gonna be nice.
Heath: So what are some of your plans for it?
Jeff: So my plan is the right side with the double doors is going to be the shed.
And then the idea is going to be to use this half as a place where I can work on things, paint things, whatever you can't do in the yard that is weather permitting.
Heath: Sure.
So you never had power in the old shed?
Jeff: No.
I thought I would, and it was just too small.
Heath: Okay.
So charging stuff.
Maybe a small workshop, some lights.
Jeff: Yeah.
Heath: And who knows?
Might grow down the road.
Jeff: Hopefully it will.
But for now, it should be enough where I can get things done.
Heath: All right, so I got a couple of thoughts and you tell me what you think.
Jeff: Okay.
Heath: I'm thinking maybe a panel over here.
Um, maybe do an eight-foot LED light up here, get a couple of outside lights, some general receptacles.
But the nice thing about the panel, it'll give us room for growth.
So as you want to add things, if you brought different equipment in, if it turned into more of a wood shop or more of an enclosed space, we have some space to do that.
I think the next step would be, let's go outside and take a look at that corner and see what we have a path to get to the house.
Jeff: Okay.
Heath: So we know we're going to this corner of the shed that looks wide open.
That should be pretty good.
Jeff: Okay.
Heath: And then we have a nice flat yard.
This is kind of nice.
It shouldn't be too, too bad, hopefully.
We're coming back to the house.
So whereabouts can we go in in the house exactly, Jeff?
Jeff: Well, the back of the house where the door is has a crawl space.
So we probably have to go all the way into the corner.
Heath: All the way to the corner, so the crawl space really isn't accessible.
Jeff: It's not.
Heath: Okay.
So we're going to go back to that corner and that should get us into the regular basement?
Jeff: Yes.
Heath: So I see what looks like, what did you say that was a coal chute maybe?
Jeff: An old coal chute, yeah.
Heath: And then a window.
Then we have some trees and the garden there.
So it looks like we kind of want to go between that coal chute and the window?
Jeff: Yeah, it looks the most direct route.
Heath: All right.
Well, from there to the shed should be a straight shot.
But let's go take a look in the basement and make sure we can actually get to that point.
Jeff: Let's go in.
Heath: All right.
All right, so this looks like the window that we saw outside.
Right, Jeff?
Jeff: Yes.
Heath: And we can see the insulation where the coal chute used to be.
So this is the area that we wanted to come into.
Now, I don't want to come in here because we have all the plumbing pipes and everything going upstairs.
So I think we'll bring our PVC in on this side of this joist.
So we'll hug kind of close to this window, come in here, put our box, and then run our cable towards the panel.
Whereabouts is the panel?
Jeff: It's in the right-hand corner.
Heath: Let's go take a look at that.
Jeff: Okay.
Heath: All right, Jeff, so this is the main panel?
Jeff: It is.
Heath: All right.
Looks like you got a lot going on in the house.
Jeff: A little overkill.
Heath: [Laughs] That's okay.
This isn't rated for those little tandem breakers, looking at the panel covers.
So I don't want to put those in.
Is there anything we could possibly get rid of or combine that you know of?
Jeff: Yeah, there's a few outlets on the old workbench that I won't be using any longer.
Heath: Oh, great.
So use part of this as a shop, but some receptacles we don't need anymore, especially if we're gonna put the shop out in the shed.
Jeff: Yes.
Heath: Great.
So we can get rid of those, make some space and put our new two-pole 60 amp breaker here.
So looking at this, I think we've got a pretty clean shot back over to where we're going out.
I think we have our path.
So I think that part's good.
I say the next step was going to call someone I know to start digging out back, and I'll order some supplies and we'll get started.
What do you think?
Jeff: Great.
Let's get started.
Heath: Let's set up.
Hey, Ryan.
Thanks for coming.
Ryan: Thanks for having me.
Heath: So I think we've got a pretty simple job for you.
We're looking to just dig a trench from that corner of the shed over there in a fairly straight line, back to the house over there.
We're gonna try and get in between that old coal chute and the window over there.
Might be a little tight, might do a little hand digging, but hopefully not too, too bad for you.
Ryan: No problem.
We'll get it done.
And, uh, you think two feet deep, little sand underneath the pipe?
Heath: I think somewhere around two feet will probably be good.
We're looking to get to 18 inches at the top of the pipe, so we want to go down just enough to get a couple inches of sand below it and then get the conduit on top.
So if you can get us somewhere around two feet, that'd be great.
Ryan: You got it.
Heath: All right, and we've already called Digsafe, so we should be set to go.
So if you want to get started on that, I'm gonna grab some materials and get started in the shed.
Ryan: Perfect.
Thank you.
Heath: Thanks.
♪ ♪ ♪ ♪ All right, Jeff, so Ryan's down there finishing up the trench.
He's just cleaning up that last end up against the house.
So while he's finishing that up before the sand goes in, we're going to go ahead and put our fitting in here.
It's going to be our starting point.
So what I have is I have an LB fitting.
L back, the wires come up and go in.
It's going to mount like this probably right about there.
And then I have our expansion fitting.
And what I want to do is I want to set it.
We can see this is designed for expansion, so as the earth heaves we get frost heaves around here that this is going to move up and down and it's not going to damage the wire, damage the pipe or rip anything out of the building.
Everything stays intact.
So where I'm going to set it, it'son this black line.
So I want that right about there.
That gives us plenty of movement in both directions for what we're doing, and we want to see where we're going in.
Now, I know we measured center of our bay off of the outside trim was 29, on the inside... And that of course, puts us right there where we don't want to be.
So what I'm going to do is I'm going to come to the left a little bit.
We'll drill the hole here, and then I'll just take a heat blanket and bend that pipe if we need to, to get to the center of the knockout for the panel.
So I want to find our height and I just want to be somewhere up here above grade.
We don't want it sticking up too far because I don't want to see it too much.
You can obviously paint it to make it blend in with the shed, but I think somewhere down here is fine.
The expansion is above grade.
That should look pretty good right about there.
So I'm just gonna make a little mark.
So what I want to do now, Jeff, I'm just going to put a pilot bit through.
After that, and we'll put the larger hole through and get this mounted.
Jeff: Makes sense.
It looks good.
Heath: So now that we have that where we want it... ...just gonna make sure we're plumb.
Take this clip.
So that's in place.
This will be our starting point for the PVC and the trench.
We'll be able to come down and come over, and once we're complete, we'll put a little bead of caulking around this to kind of help seal this up.
So let's go see if Ryan's all set.
And then we'll work on getting the sand in here and then we can get the PVC in.
Jeff: Great.
Heath: All right, Ryan, looks like the trench is done.
It looks great.
Ryan: Thank you.
Heath: It didn't look like the digging was too bad either.
Not too many rocks or anything crazy in there?
Ryan: Not too bad.
But we're still going to put some sand down underneath.
Heath: Absolutely, and the reason is because sometimes we have stuff like that.
If anything heaves or frost or forces anything up, this rock might try to come up through the ground.
We have a bed of sand around the conduit to keep everything protected.
So it's just a good practice to get into.
So if you have plenty of sand, you're going to run the machine.
Jeff, you and I got to get busy jumping that trench.
Start spreading the sand out and make it smooth.
And we want to make sure that we still have 18 inches to the top of our pipe when all said and done, but I think that trench looks plenty deep enough.
All right, so now that we have the sand in the trench, it's time to install the conduit.
So we left it up here because it's easier to work with up on the grass area than it is in the trench.
And we're not going to fill it up with sand as we go.
We want to keep it as clean as possible.
So we're going to go ahead -- We have a bell end and the smooth end, and we're gonna go ahead and glue these together.
Jeff: So can I ask you a question?
Heath: Absolutely.
Jeff: Why did you have me lay it out in this direction, bell end that way?
Heath: That's a great question.
The reason is your yard pitches back from the house towards the shed.
We want to have the bell facing down.
I want it like this.
So if water happens to get in there and starts running by, I want it to go around the fitting.
If we had it the other way and we were running the bell uphill, water can come in and has a chance to get around this edge.
In case the glue didn't set entirely properly, it has an option to get in there, and we want to try and avoid that.
Jeff: Makes sense.
Heath: The other thing I want to do is we can either tape the end or I'm gonna use this little cap.
I'm gonna have you put this on the open end as we throw it in the trench, just to help keep any sand out.
We're not gonna glue it.
Just a real light press to kind of help keep the conduit clean.
So we're gonna go ahead and clean these two, glue them, and I'm gonna put our 90 on this end.
We'll get this into place.
Then we can measure and connect on this side.
And then we're gonna work our way back.
♪ ♪ ♪ Turn.
Jeff: Like it?
Heath: I like it.
The conduit is covered with a layer of sand for protection.
♪ So for this, we have to actually drive two ground rods.
My first one's there, and they want to be six feet apart.
The ground rods are eight feet.
So I'm just gonna use this as a quick measurement.
I know I want to be at least this far away.
So now I'm just gonna take my bare number 6 here... and connect it to the two ground rods.
And you can see we didn't cut the wire.
We slid this connector down so we can go ahead and make this connection unbroken.
And once I tighten this up... [ Ratchet clicking ] All right.
That's in place.
Then we're gonna go into the building and into the panel.
All right, Jeff.
So we've got our ground wire in.
We've got the trench filled.
We're about six inches down from grade.
So we're ready to go ahead and put the caution tape in before we put the final grade on.
So this is the stuff we're gonna use.
I'm just gonna have you walk this down, and I'll tie it off to the conduit on this side.
Jeff: Okay.
Why do you need the caution tape?
Heath: We want the caution tape up here because if you ever do any digging in the yard down the road, even for plants, you're gonna hit this tape first.
Once you hit that, you'll know there's a buried electric line down here so you don't go too deep and you'll be careful of it.
Jeff: Is this a certain type of caution tape?
Heath: It is.
We use this metallic tape.
It's traceable, so the nice thing about this is if you're not sure and you want to mark exactly where everything was, gonna leave a little end over here that you can get to.
There's a toner you can put on this and actually trace out exactly where this tape goes, and this tape is directly on top of your conduits.
So it'll be easy to find out exactly where everything is.
Jeff: That's good to know.
Heath: With the caution tape installed, it's time to backfill the trench.
We picked this bay for our panel, and this is the panel.
We're gonna slide it in somewhere around here, maybe a little bit higher.
So what I want to do is we have our PVC coming in down here already, and we now have to continue that up into the panel.
But you can see we have this cross block.
And this is our connector that's gonna go on the bottom of the panel here.
So what I'm gonna do is take that knockout out... slide that down, set my depth, mark the cross block.
Then I can take this back out and drill this.
I'm gonna do the same thing for a smaller conduit for the ground wire to come in as well.
So we'll have those in.
Then we'll come back down bottom.
We'll put the PVC in, mount the panel, put the one in for the ground.
Then we can pull the wires, get them into place, and get some power on.
Jeff: Great.
Heath: Now I will just slide that ground up the conduit we just put in.
Jeff: I got it.
Heath: Okay.
Take some slack up.
Jeff: You got it.
Let me know.
Heath: Got enough to get to the top of the panel and go across?
Jeff: Yes.
Heath: Okay.
All right, Jeff.
Now that Ryan's done with that trench, he did a great job with it, and he's got everything graded, and our conduits are completely covered, it's time to pull the wires from the house to the shed.
So what I've done, I've set up a spool up here with the wire.
And down here, I have the pull line.
So I'm gonna put a fish tape down this conduit.
It's gonna pop up to you.
You'll tie the pull line on.
I'll pull it back, and then I'll tie the wire on, and we'll pull that to the shed and get that into the panel.
So our conduit's been oversized for future use, so it's much bigger than we need for these wires.
I'm just gonna do a couple of hitches, really.
And then I'm gonna tape the front.
What I want to do is I just want to smooth these out with the tape, just in case there's an edge in the conduit.
I don't want it to catch that.
I want it to be able to pull right by.
All right, Jeff.
You want to take about six feet of slack on the pull line, please?
Jeff: Okay.
Heath: Okay.
It's started, so you can go ahead.
Jeff: I'm here.
Heath: Perfect.
All right, Jeff.
You want to feed that through?
Jeff: Coming in.
Heath: That's good for now.
Let me try that.
All right.
We're good.
Let's throw the covers on.
All right, Jeff.
Now that we have the wire in here, our panel's ready to go, everything is complete here, it's time to do the fun part -- wire the shed.
So we have a minimum requirement.
When we have power to an outbuilding like this, we have to have at least one receptacle in here and one light, which we're gonna have.
We want a receptacle over here.
You said possible fridge.
We're gonna have the LED light up top.
And we're gonna put an outside light over that door.
I think that ought to keep you pretty good for now.
Jeff: Yeah.
That'd be great.
Heath: All right.
We have plenty of room to grow.
Let's grab some wire and we'll get to work.
Jeff: Great.
[ Drill whirring ] Heath: Make sure we got enough to go over straight and go down to the switch.
♪ ♪ Once all the connections are made, we can add and wire the new circuits into the main breaker panel.
This should only be done by a licensed electrician while the electrical service has been completely disconnected.
♪ Just in time.
Jeff: Great.
Heath: Power's on.
Everything's turned on.
Want to give the lights a shot?
Jeff: Sure.
Wow.
It's incredible.
Heath: That's a big difference, huh?
Jeff: Been waiting a long time for this.
Heath: Yeah.
So, I mean, this is a great shed.
Now you get the power out here.
Honestly, I'm kind of jealous.
Jeff: I can't wait to get started out here.
Heath: This has been a great project.
I really appreciate it.
Jeff: Thanks for your help.
Heath: Thanks for letting us do it.
Jeff: Great.
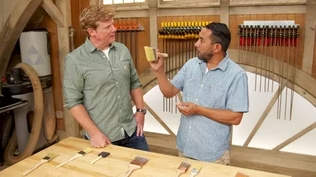
♪ Kevin: Mauro.
Mauro: Kevin.
Kevin: So a quick refresher on kind of what we need for a paint project.
Mauro: Absolutely.
If you get an interior room or an interior painted door, this is the stuff we need.
Kevin: Where do we start?
Mauro: We start with this -- protection.
We've got drop cloths to protect all the floors.
And then we have this sheeting plastic, which has the tape on it that you can use on your walls to protect the walls so you don't the walls.
This is very handy.
And then we got this other sheeting plastic over here.
I can cover furnitures with that.
Kevin: Canvas on the floor.
Never plastic on the floor.
Is that right?
Mauro: I don't like to put plastic on floors because it's very slippery.
Kevin: Okay.
So we've protected.
Now we're painting.
Mauro: Well, now we're painting.
So here we have the paint tray, all right?
And the paint tray... Kevin: For the roller.
Mauro: For the rollers.
And then we have the rollers.
It's a nine-inch roller, 3/8.
Good for all smooth surfaces in general inside the house.
Kevin: The nap is sort of how smooth or how fluffy it is.
So 3/8.
And then what would this be?
Mauro: This is 3/4.
Kevin: You'd use this and this when?
Mauro: I need this when I have a texture wall or a popcorn ceiling.
This comes really handy.
Kevin: And this one's for your flat surface.
Mauro: This is for the flats, the smooth surface, like walls and ceilings.
Kevin: Then you've got the tray, which, of course, is important.
So you've got the well there.
Mauro: You got the well there.
You got the grid.
So you put the paint in there, take some of the excess off the roller, and go to work.
Kevin: Beautiful.
All right.
And then this.
Boy, this was a game-changer when they came out.
Mauro: This thing here.
I love it.
When I found it, I bought about five of them.
And this is so cool.
You use the small brushes to do all your cutting line, on the tight space, in between trim and the walls.
Put it there.
Do your cutting.
Kevin: Little magnetic.
Sticks to the ferrule there.
Mauro: Don't need to be right into the bucket.
Kevin: So small and tapered for trim, cutting.
Mauro: Cutting lines in general.
Kevin: Beautiful.
And then obviously your rollers are going on this for hand.
But I see the extension Mauro: The extension.
You need this one over here.
This one is so cool.
You hook right in there.
Make sure that's tight.
And this - You press this down, and this becomes like a telescope.
Kevin: Perfect.
Yeah, yeah.
Mauro: You can go all the way up to there.
Kevin: Get the ceiling and high walls.
Mauro: Get the high spots done in one shot.
Kevin: Comprehensive list, Mauro.
But you know what?
We've done this before.
And I am thinking there's something missing.
Mauro: You're missing something?
I got it right here.
Kevin: There she is.
The 5-in-1.
Mauro: This is not the 5-in-1.
5-in-1's a thing of the past.
This one is about 17-in-1.
We got the big round over here.
That's good for cleaning rollers at the end of the day.
Kevin: Scrape it off like that.
Mauro: Yeah.
And if you turn it over, there's a small one here that's for mini rollers.
But we have the range.
So you have nail pullers.
You get a bunch of stuff.
You scrape it right in there.
Kevin: That one is stitched to your hips at all times.
Mauro: Oh, yeah.
Right here.
Kevin: All right.
Good list.
Thank you, Mauro.
Mauro: Hey, you're welcome.
♪ Kevin: Hey, folks, and welcome back.
I'm your host today, Kevin O'Connor.
And we are gonna be playing Compost or Dispose It.
So our contestants are gonna tell us whether or not, when I show them the item, if it should go down in your disposer or if it should be composted.
And our contestants come to us today from Irvine, California -- Mr.
Richard Trethewey, our plumber.
Richard: I'm so glad to be here, Kevin.
I love your show.
Kevin: Oh, wonderful.
Thank you.
And he'll be playing against the infamous landscaper from your backyard, Jenn Nawada.
Jenn: Oh, my gosh!
It's so exciting to be here.
Kevin: All right.
Well, are you guys ready to play Compost or Dispose It?
I'm gonna hold up a card.
And when you see the item, you have to tell us whether we're going to dispose it... [ Disposer grinding ] ...or if we're going to... compost it.
[ Cow lows ] All right.
Ready for your first challenge?
Richard: I am.
Kevin: All right.
Here we go.
Jenn: We are.
We are.
We.
We are.
Kevin: And it is... Richard: Chicken.
[ Cow lows ] Richard: I definitely wouldn't do that down on the grinder.
It's got all that skin on it.
Kevin: So meat bones.
Jenn: Yeah.
Well, I don't like to put them in compost.
So yeah.
But you can.
Citywide, they collect food waste, and they compost it that way.
Richard: Skin goes in the compost.
Bone goes to your puppy.
Kevin: Well, now, that's exciting.
Richard: Not in the grinder.
Jenn: You can't give dogs cooked bones.
Anyways.
Anyways.
Kevin: Kids, let's go on to the next one.
[ Laughter ] All right.
Now we're gonna ask.
Are you ready to fight?
Are we gonna dispose or compost a... banana peel?
[ Cow lows ] Richard: Definitely I would go compost.
Anything that's stringy -- banana peels, celery -- anything that's stringy can get wrapped around the blades, and it's not good.
Jenn: Right.
'Cause it just tangles up like hair.
Richard: Yeah.
Kevin: Not just fun.
Educational as well.
[ Laughter ] Well done, Jenn.
Thank you, Richard.
Ready for our next question as to whether we're gonna compost or dispose.
Richard: Ready.
Kevin: Coffee grounds.
Jenn: Um... [ Cow lows ] Richard: Coffee grounds are not good not necessarily in the disposer, but in the drain.
You don't want the coffee grounds going down and then re-coagulating down the pipe.
Jenn: Would that be like a clogged artery, kind of?
Richard: [ Grunting ] Yeah!
Jenn: Hunh!
Okay.
Okay.
Kevin: Okay.
And on to the next one.
Tough one here.
Pay atten-- Get ready.
Ice cubes.
Richard: You know, you're certainly not gonna put it in the compost bin.
I think it belongs in a glass for a drink.
I really do.
Jenn: But if you had to pick one... [ Disposer grinding, bell chimes ] Just a little bit, right?
Richard: That's right.
Jenn: Is that an old wives' tale -- sharpening blades?
Richard: Yes.
Jenn: Okay.
It is.
Kevin: But if you have an old wife, you're gonna want that drink.
[ Laughter ] So, Richard, a two-- [ Laughs ] a twofer.
Richard: Yeah.
So true.
That's so true.
Kevin: All right.
Grind or compost pistachio shells?
[ Cow lows ] Jenn: All day long.
Richard: All day long.
Yeah.
Jenn: Yep.
Richard: You're nuts.
Jenn: [ Laughs ] You don't want those shells in your compost.
Richard: No, no.
I don't.
Kevin: Okay.
Moving on.
Just two left.
Richard: [ Laughing ] That's right.
Kevin: It's gonna come down to the last two.
Compost or dispose eggshells.
Jenn: I'll take them.
Richard: You take them.
They say don't do it in the grinder.
But we can still handle it.
Jenn: But they're so fragile.
Kevin: Where should you do it?
Richard: I'd put it in the compost.
Jenn: Is it the membrane?
Richard: No.
It's little tiny shells.
But it'll wash through.
I think that's a bit of a wives' tale to not put it in the disposer.
Jenn: Okay.
Especially new disposers.
Richard: They're so amazing.
Yeah.
Kevin: It's a short game, guys.
It's a short game.
Jenn: I'll take them.
Kevin: All right.
Comes down to the last question.
So, should we compost or dispose lemons?
Jenn: I'll take them.
Kevin: Ah.
Richard: You can put them in the compost.
But save me one... [ Disposer grinding ] ...to grind it, to put it into the disposer, 'cause it can freshen that chamber that can often smell.
Kevin: And who doesn't want a fresh disposal?
Richard: There you go.
Jenn: I'll share.
I'll save you one lemon, all right?
Kevin: All right.
Lemon goes in both.
I think that's a fine way to end.
Richard: Thank you.
Jenn: So wait.
Is that a tie?
Richard: Did we win?
Kevin: Yes.
Well, uh... Jenn: Aah!
Kevin: Jack, what's the official score?
Jenn, well done.
All right.
Well, that's it for Compost or Dispose It.
And rest assured, we'll never be doing this again.
♪ Kevin: Next time on "Ask This Old House," Tommy teaches Zack how to turn a flower vase on the lathe.
Zack: This is so much fun.
Tom: Yeah.
Kevin: Then Mark answers viewers' questions on masonry cracks, offering advice on how they happen and possible repairs.
And Ross helps a homeowner upgrade their garage-door opener.
Ross: Voilà.
Man: That's unbelievable.
Kevin: All that on "Ask This Old House."


Support for PBS provided by:
Funding for Ask This Old House is provided by The Home Depot, Renewal By Andersen, and ChipDrop.