Blackened Chicken and Roasted Okra
1/7/2023 | 26m 46sVideo has Closed Captions
Blackened Chicken, Roasted Okra with Spicy Red Pepper Mayo and spice storage solutions.
Test cook Dan Souza makes host Bridget Lancaster the ultimate Blackened Chicken. Equipment expert Adam Ried reviews spice storage solutions, and tasting expert Jack Bishop talks all about corn products. Test cook Becky Hays and host Julia Collin Davison cook Roasted Okra with Spicy Red Pepper Mayonnaise.
Problems with Closed Captions? Closed Captioning Feedback
Problems with Closed Captions? Closed Captioning Feedback
America's Test Kitchen is presented by your local public television station.
Distributed nationally by American Public Television
Blackened Chicken and Roasted Okra
1/7/2023 | 26m 46sVideo has Closed Captions
Test cook Dan Souza makes host Bridget Lancaster the ultimate Blackened Chicken. Equipment expert Adam Ried reviews spice storage solutions, and tasting expert Jack Bishop talks all about corn products. Test cook Becky Hays and host Julia Collin Davison cook Roasted Okra with Spicy Red Pepper Mayonnaise.
Problems with Closed Captions? Closed Captioning Feedback
How to Watch America's Test Kitchen
America's Test Kitchen is available to stream on pbs.org and the free PBS App, available on iPhone, Apple TV, Android TV, Android smartphones, Amazon Fire TV, Amazon Fire Tablet, Roku, Samsung Smart TV, and Vizio.
Providing Support for PBS.org
Learn Moreabout PBS online sponsorship♪♪ ♪♪ ♪♪ ♪♪ ♪♪ ♪♪ -Today on "America's Test Kitchen," Dan makes Bridget blackened chicken, Adam Reviews spice-storage solutions, Jack talks all about corn products, and Becky makes Julia roasted okra.
It's all coming up right here on "America's Test Kitchen."
"America's Test Kitchen" is brought to you by the following.
Plugrà European-style butter was created for all chefs, cooks, and bakers.
Slow-churned with 82% butterfat for a smooth texture and more pliability for flaky crusts.
Plugrà -- from professional kitchens to your home.
Sailing with American Queen Voyages brings you to mighty rivers and unique expeditions, where passionate explorers can discover the continent of North America.
You can learn more about our voyages at AQVoyages.com or contact your travel advisor.
Sur la Table, where you can discover an assortment of provisions for your next meal or gathering, from cookware and tools from a wide variety of kitchen brands to hands-on cooking classes.
Visit us at surlatable.com.
-The method of blackening foods really hit its stride all the way back in the 1980s, when famed New Orleans restaurant K-Paul started featuring blackened red drum on its menu.
That's a local redfish.
And soon restaurants all over were featuring the dish, which caused an overfishing issue.
So restaurants had to start blackening other things, like shrimp and steaks and chicken, which Dan's gonna show us how to make today.
I think this gives blackened fish a run for its money.
It's just as popular.
-Yes.
It's so good.
I think the first thing we have to sort out here is what blackening actually is.
-Right.
People are very confused, I think.
Is it a spice blend?
Is it a cooking method?
Is it something you can do at home?
-Right.
-And the answer is to all of those yes.
-Okay.
-So it's a lot.
There's a lot going on here.
We're gonna start with the spice blend itself.
We're gonna start with a tablespoon of smoked paprika.
-Mmm.
-It's gonna add a little bit of smokiness to it, which is great.
That's kind of the direction that we're heading.
And then a tablespoon of regular paprika, sweet paprika, a tablespoon of kosher salt, 2 teaspoons of onion powder, 2 teaspoons of garlic powder, 1 1/2 teaspoons of ground black pepper.
We've got 1 1/2 teaspoons of dried oregano, 1 1/2 teaspoons of dried thyme.
-Okay.
-And then the last ingredient is a little more flexible -- 1/2 to 1 teaspoon of cayenne pepper.
And this is really how spicy you want yours to be.
I'm gonna use the whole thing, but you can absolutely pull back here if you want less.
-Okay.
I like it spicy.
-And then so you just use your whisk to combine this in a nice pie plate here.
-Now, it's great that you're kind of controlling the spice levels here instead of buying something that's premade.
-Absolutely, yeah.
And you can, you know, pick the ingredients that you want, get a good brand of Spanish paprika.
You can make something that's a lot nicer.
Okay, that's great.
I'm gonna set this aside.
And we'll get into our chicken.
We're working with four 6- to 8-ounce chicken breasts.
Now, we're gonna do cutlets.
One of the reasons for that is we want them to cook through in the same amount of time it takes to get beautiful blackening on the outside.
So if you have a really thick breast, like a whole breast in there, you're gonna, like, actually get burning before the inside is done.
-Gotcha.
-And blackening really is this fine line between Maillard browning, which we love on steaks and everything, and actual burning.
Now we're gonna work with our cutlets.
If you know the old method of making cutlets, where you take the whole breast and you try to go through this way, it's challenging.
-Yes.
-It's hard to get them even.
And you start with a thin end and a thick end, so it just doesn't line up well.
So this is a truly game-changing way to make cutlets.
I absolutely love it.
So what we're gonna do is actually slice right down the middle.
So we've got our nice, thin piece there.
And then I move this to the edge.
And this is the only part that we're gonna halve through the center.
-That's great, because it's already relatively even.
-Exactly.
So our thick part becomes two nice, thin parts.
-Nice.
-And we're gonna pound them a little bit, but I'm gonna go through all the breasts first.
-Okay.
-Okay.
So we're gonna pound the chicken out to about 1/3 inch, which isn't gonna take that long, considering that they're already nice and thin.
-Yes.
-But I'm gonna use some plastic wrap to make this a whole lot easier.
And I'm gonna space out.
I like to do half and half, so let's do six and six.
-Another bit of plastic on top.
-Just makes it nice.
You're not getting everything stuck to the meat pounder.
-Yes.
-It makes it a whole lot easier.
Alright.
So we're looking for about 1/3 inch thick, which doesn't take very long to get those down to it.
-Alright.
Ultra thin.
-Ultra thin.
Now that we have all of our cutlets pounded out, it's time to dredge them.
So, I just have a nice order of operations here.
We're gonna go from here into here and then there.
-I see that.
-I like to really dredge all over, and then we'll just do a little -- little pat and shake, make sure we don't have any excess on there.
This is so aromatic, though.
You can already smell basically everything that's in it.
-There's cayenne in the air.
-So, I'm gonna keep dredging these until I have all of them done.
-Alright.
-Okay.
So we did all of the spice part of blackening, right?
So we understand that.
Now time for cooking.
-Yes.
-A lot of people think that it's only a restaurant dish because you need a super-powerful hood.
You have tons of smoke, and it would smoke out a house.
-Right.
-And that is true if you try to do exactly what they do in a restaurant.
We found some cool tips to actually minimize the smoke.
You'll see that it's a lot less than you might expect.
-Okay.
-So, we're starting with a cast-iron pan here.
This is a nice, 12-inch one.
It retains a ton of heat, so you're gonna get really good browning and blackening on this.
-And quick.
-And quick.
Yep.
I'm gonna start with a teaspoon of oil.
This is really gonna be mostly an indicator for when this is hot.
So we want to get this oil to the point where it is just starting to smoke.
We're in really good searing territory when it hits that point.
-Okay.
-So, I have the skillet over high heat, and that's where we're gonna do all of our cooking.
We've got wisps of smoke.
That means it's very, very hot.
Now I'm gonna go in with my butter.
This is a tablespoon that's just cut into a couple of pieces.
And I want to get it nice and melted in there.
The protein in the butter and the milk solids is gonna help us with beautiful browning and blackening.
If we got it in there too early, you can see there's a ton of smoke from that.
-Right, right.
-So that's great.
And now we're gonna go in with six of our cutlets.
[ Sizzling ] So, crowding the pan like this and actually covering most of the surface area is really key to this recipe.
Any spots where you don't have it, they heat up a lot more, and they turn that fat into a pretty smoky mess.
-So everything I've ever learned about sautéing I should just throw out the window.
-Chuck it out the window.
-Alright.
-So, we're gonna put them in and press them down with our spatula.
We want really good contact.
We're gonna leave them undisturbed for two minutes.
We'll get beautiful blackening.
-Sounds great.
-Okay, that's two minutes.
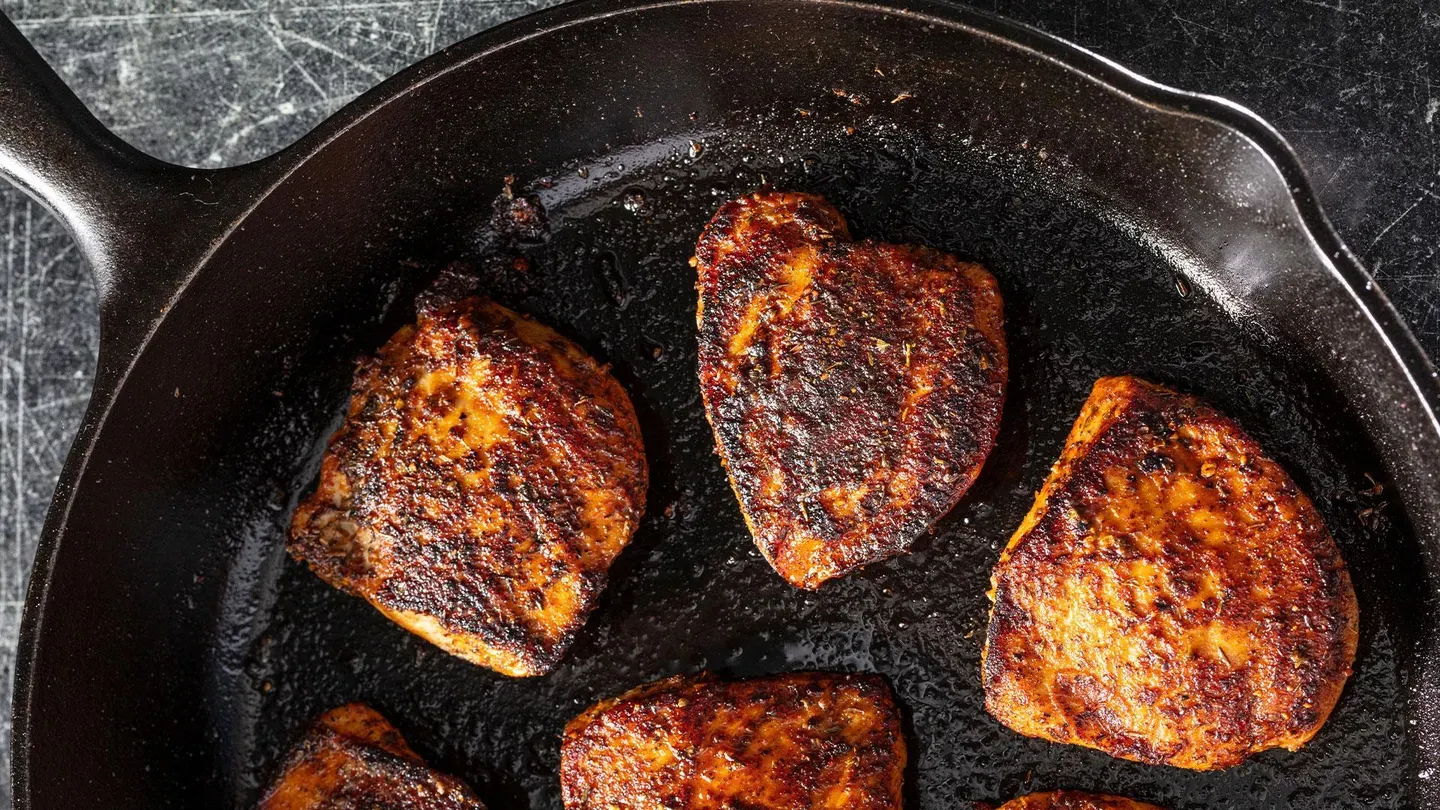
We're gonna flip them over.
-Mmm!
-And look at that beautiful crust.
-Gorgeous.
That is beautiful.
-Beautiful.
-You can still see a little bit of that red color coming through.
-Red color, the browning, and some a little bit charred spots.
So, this just takes another minute on this side, 'cause they're so thin.
And then we'll get them right out of the skillet.
-Sounds great.
-Okay.
So I'm gonna move this off the heat here.
-Whoo!
-We don't want that skillet to keep cooking as we get the chicken out.
And we'll transfer these over to our wire rack.
Man, these smell good.
-We're well beyond good here.
This smells amazing.
It doesn't smell burnt at all.
-So, I'm gonna use a paper towel here to clean out some of the debris in the bottom.
We're gonna do our next batch.
And if you leave all that in there, it already wants to burn, so... -Right.
-...you're gonna start in a very smoky place.
So, we want to be right over that same heat.
-Back to high.
-Back to high.
For this batch we're gonna use -- you can see the smoke -- we're gonna add 2 tablespoons of butter.
We don't have the initial fat from the oil that we put in.
-Right.
-So we're gonna use all of this.
That brown butter smells so good.
-Gorgeous.
-Great.
And then we'll go right in with our second batch.
And then again, we're gonna press down, make sure we have really nice contact between both surfaces.
That's gonna help with browning.
-Okay.
-So, we're gonna go two minutes on this side.
We'll get beautiful browning.
We'll flip over.
And then just another minute on the second side and they'll be done.
-Fast food.
-Beautiful.
So that's been two minutes.
And we'll get them on to the other side.
-Look at that.
-Lovely.
So we're gonna let it finish on the second side.
Takes about a minute.
I'm gonna pop them on the wire rack, and we'll let them rest for about three minutes.
Then it's time to dig in.
-Fabulous.
-Okay.
We're about to eat.
-Yes.
-We've got all of our cutlets over here.
The final batch rested for about three minutes.
So I'm just gonna platter them up.
-Because at this point, you are competition for the restaurants, so you have to make it look really nice.
-Exactly.
Yeah.
I want to stay in business.
-Yes.
-I feel like once you try this recipe, you just start blackening everything in your kitchen.
-[ Laughs ] -Alright.
Can I serve you one or five?
-Y-- We'll see.
Well, the plate kind of limits.
-I know.
We'll get bigger plates next time.
-There we go.
I do have to smell this.
Beautiful.
-Pretty good?
-Beautifully spiced.
-I know.
Look at that color.
-Not even a slight aroma of anything burnt... -Yep.
That's great.
-...which is great.
-Alright.
Let's try these.
-Mmm.
That's warm.
That is a beautiful blend of spices.
Ooh, I get that smoked paprika there.
-Mm-hmm.
Yeah.
-Mmm.
Chicken is so tender.
-You actually get crustiness... -Mm-hmm.
-...you know, from all the spices and the butter and all that kind of browning.
It's -- It's crispy on the outside, and you get this rich, rich flavor.
It's a little hard to pin down in kind of a nice way.
-It really is.
-Yeah.
-But it's that brown butter.
You're right.
That brown butter kind of brings forth all those other flavors.
You get the warm spices in there.
You get a little bit of an herbal note, a little bit of a creeping heat.
-Mm-hmm.
-Mmm.
And I love the ratio.
The chicken is pounded so thin that you get this beautiful ratio of meat to spice.
-That's true.
-It's almost equal.
-That's exactly right.
It's juicy, it's flavorful.
-Really.
-It's like, you know, a snacky food you want to keep going.
-Mm-hmm.
And this came together really quickly, too.
-Mm-hmm.
Super quick.
-Excellent, excellent chicken.
-Thanks.
-Thanks, Dan.
If you want to make this beautiful blackened chicken at home, press thin chicken cutlets directly into a smoky, spicy mixture, cover as much of the pan as possible with the chicken, and then be sure to wipe out the skillet between batches.
So from "America's Test Kitchen" via New Orleans and the 1980s, it's the beautiful blackened chicken.
Mmm.
Not brown, definitely not burnt.
-Blackened, right in the middle.
-Right there.
-We get a lot of questions here at "America's Test Kitchen" about the best way to store spices.
And today, Adam Reid has some answers.
-Let's hope I have some answers, 'cause there are a lot of spice-storage systems out there.
We had a lineup of 10 different units.
They were based largely on the kind of space you have in which to store your spices -- if it's a cabinet or a drawer or a tabletop, maybe the back of a door.
Price range was $12 up to $59.
And for all of the testing, we use sort of a standard size, 4-fluid-ounce-tall spice jar.
Regardless of the style or the space you have to store spices, we were looking for a couple of different factors.
One is capacity.
-Yep.
-You want to be able to expand that spice collection.
So our testers were looking for a minimum capacity of about 50 jars.
-Uh-huh.
-They were also looking for configurability, because not every cabinet or drawer has the same dimensions.
So if you can expand or adjust the unit for the space you have, that's very helpful.
Visibility super important, because this is about spot, grab, and go.
You're cooking.
-[ Laughs ] -You want to be able to see what's there, especially in the middle or the back.
And testers also thought it was really nice if there was some way to stabilize the jars on the shelves so they weren't, like, clanging around, slipping around too much.
-I like it.
-If a spice rack was unstable or flimsy -- Check out this white one there.
-Alright.
Oh, my goodness.
-[ Laughs ] -I wasn't expecting that.
-Can you imagine, like, just grabbing something really fast and the whole thing goes over?
-No.
This would not survive me.
-Demerits for anything that was that flimsy.
There were winners in a couple of different categories.
-This one is the Spicy Shelf Deluxe.
It's U-shaped.
-Mm-hmm.
-It's about $25.
It fits into cabinets.
This is our favorite for a cabinet, because it hugs the sides and the back of the cabinet.
-Right.
-It's got a capacity of 54 jars.
-Nice.
-Very good solution for cabinets.
If you want to have a tiered spice-rack organizer in your cabinet, this clear one here is the mDesign three-tier expandable spice-rack organizer.
-Yep.
You can slide it in and out.
That one was great.
The spices were nice and visible.
That one also has a capacity of 54 jars.
-Nice.
-If you are storing your spices in a drawer, this is your one.
This is what you want to go for.
-Ah!
-That is the Lynk Professional four-tier steel spice-drawer organizer.
This had a capacity of 64 jars.
Testers basically liked it, except they found that if you have a really shallow drawer... -I do.
-...and it was loaded up, it could interfere with the drawer closing.
So make sure you measure your drawer first.
They also wouldn't have minded if this had a little silicone liner to keep the jars from clanking around.
So, if you have a door available in your kitchen and you can use the back of the door, this is the one that you want.
-Whoo!
-This is the Home-Complete over-the-door storage rack.
$59, but get this -- it's got 8 shelves that hold 27 jars each, for a total of 216.
-That's a lot of spice.
-Let's get some more spices.
-[ Laughs ] -It also fits different-size containers.
-Yeah.
-You can put cans and bags and jars and boxes galore.
It really is a great way to expand your pantry space.
-I like that one.
-Yeah.
-This is magnificent.
-I think we need to go spice-shopping.
[ Both laugh ] -Fill her up.
So there you have it -- spice-storage organization for every household.
-The overall winner for cabinets is the Spicy Shelf Deluxe at just $25.
-Imagine the entire country of Germany covered with this.
Yes, that's how much corn is under cultivation in the United States.
And you may think most of it is sweet corn destined for that summer barbecue, but that's not actually true.
Most of it is dried corn that's ground and ends up in our pantry.
So, let me take you through some of the ways that we use ground corn.
First off, cornmeal.
Of course, you're gonna use this for cornbread, muffins, to dust a pizza peel.
This is our favorite, from Anson Mills.
It's got a very fine texture.
You can see it's almost like flour.
Has a lovely, buttery flavor.
Now, this is a mail-order brand.
So, we do have a supermarket choice, equally fine.
This is from Goya.
It has a nice, savory flavor, and we thought the cornbread was melt-in-your-mouth tender.
Next up, grits.
And you're gonna notice a much coarser texture here.
Our favorite also comes from Anson Mills.
Polenta -- coarsely ground, as well.
They can be used interchangeably, grits and polenta, but they are different.
Grits and cornmeal are made from dent corn, but polenta is made from flint corn.
And as the name flint implies, it's a much harder variety of corn, and so it takes longer to absorb water and has a coarser, slightly gritty texture.
Eventually, of course, polenta will soften up.
It just takes longer.
Flint corn is also the basis for masa harina.
Now, the Aztecs invented this process of taking flint corn, cooking it in water with calcium hydroxide, either from lime water or ash.
And what that did is it really changed a variety of things in the corn.
It changed its flavor to create that corn tortilla flavor.
It freed up the nutrients in the corn so it could be absorbed by the human body and also created a dough that you could roll out to make tortillas.
So the corn, after it's cooked in the lime water, is rinsed and dried and ground, you have fresh masa.
Now, fresh masa can be dried and ground, and that's how you get masa harina.
Think of it as a convenience product that allows the home cook to simply add water, and now you have fresh dough to make tortillas, tamales, gorditas, and pupusas.
Finally, masarepa.
In parts of South America, this is used to make arepas.
It's similar to masa harina, except the corn is not nixtamalized, so it's got a bit of a milder corn flavor.
And what I love about everything on this table, shows human ingenuity -- how we take something as simple as an ear of corn to create all of these different products that make so many delicious dishes.
-Okra is loved all over the world and added to any number of stews, curries, and stir-fries, not to mention it's delicious when deep-fried.
But today, Becky's gonna show us how to roast it.
-Oh, this is one of my favorite ways to prepare okra.
It gets nice and brown, a little bit crispy, and you just need okra, oil, and salt.
-I like it.
-Super easy.
So, we're gonna do a pound of okra.
And they can be all different widths, all different lengths.
So, you just want to choose pods that are about the same size.
-That makes sense.
-So you just want to take the caps off, split them in half lengthwise.
-Okay.
-So you're opening them up down the center, right through the core.
-That's right.
So you can see all those seeds that they're famous for.
And then I'm going to add 2 teaspoons of vegetable oil.
-Mm-hmm.
-And 1/2 teaspoon of salt.
-It's the cutting them in half that I find interesting.
-Well, we want those nice, flat surfaces, 'cause those are gonna get nice and brown and crispy.
So that's why we're cutting them.
-Ah.
That makes sense.
-Yep.
-So the oil is gonna help the salt cling here.
And I just want to give them a really nice toss.
I want to make sure that they're evenly coated in that oil and that salt so they're nicely seasoned.
Okay.
So those are nice and evenly coated.
-Mm-hmm.
-Got my baking sheet.
So, I just want to turn them all cut side down here, because the cut side browns a lot better than the curved side.
That's what we're after is that nice browning -- thank you -- and that crispiness.
-Yeah.
-Alright.
That looks pretty good.
Now I'm gonna cover these with foil.
When we roasted them uncovered, they cooked unevenly, so I'm gonna cover them with foil for the first part of cooking for 12 minutes in a 425-degree oven.
Then I'll take the foil off and let them roast for another 12 minutes.
-Okay.
So, okra can have a slippery texture, which is pleasing to some, but not to others.
And this slippery texture all depends on whether the okra's cooked with water.
Here's what happens.
An okra pod contains a wealth of long polysaccharide molecules.
When okra is stewed or simmered with liquid, its unique polysaccharides dissolve into the surrounding water, turning the liquid into a gel.
The tangle of dissolved molecules gives the liquid that distinctive, slippery viscosity.
If we cook okra in a dry environment, like roasting in the oven, the outcome is very different.
Without water, the polysaccharides can't dissolve and tangle, and the texture of the okra is delightfully firm and crisp.
So if you want to enjoy the flavor of okra without that slippery texture, try roasting.
-Okay.
It's been 12 minutes.
Let's take this foil off.
Oh, yeah.
Look at all that steam.
-Yep.
-That's what we want.
-And that's just the natural moisture in the okra doing its thing.
-That's right.
And you see how it turned nice and bright-green?
That's exactly what we want.
We're gonna roast these for another 12 minutes.
And I have these on a shiny baking sheet.
If we were using a dull or a matte baking sheet, I only want to roast them for seven minutes.
They'll be nice and brown in that time.
-Makes sense.
-So, while those finish up, let's make a nice little dipping sauce for our okra.
I have 2 teaspoons of vegetable oil over medium heat here.
You want that just to start to shimmer.
So this is gonna be a nice little dipping sauce.
This okra is great as an appetizer.
Just I'll make a tray as a -- as a midday snack.
-Oh, really?
-Even without the sauce.
Yeah.
So good.
Or you can serve this as a side dish.
-Ooh.
I like that idea.
-Yeah.
-Okay.
So I'm adding five minced garlic cloves.
-Just a little bit of garlic.
-[ Laughs ] Just a little bit.
Just want to cook this until the garlic just starts to brown.
Alright.
You can see the garlic is starting to brown, so I'm gonna add some spices here.
I have 3/4 teaspoon of coriander, 3/4 teaspoon of cumin, 3/4 teaspoon of smoked paprika.
Ooh.
Love that.
-Ooh!
-Ooh.
I smell it already.
And just 1/8 teaspoon of cayenne.
So we're just gonna cook that until that becomes fragrant.
It's happening already.
Alright.
And that is our nice flavor base for our dip.
I'm gonna take that off the heat, put this into a bowl.
-Mmm.
-You can tell that's gonna be good, right?
-Yeah.
-Okay.
Now, I just have some jarred roasted red peppers.
I patted them dry.
And this is 1/3 cup, chopped up nice and fine.
Then I also have 1/2 teaspoon of salt and just a touch of sugar -- just 1/4 teaspoon.
Stir that together.
I have a couple more ingredients to add, but I'm gonna cool this down in the fridge for five minutes first.
-Okay.
-Alright.
It's been 12 minutes.
-They shrunk.
-They did.
-We're gonna let these cool on the sheet for about five minutes, and any sticking will release in that five minutes.
-Aha!
-So while that rests for a little bit, let's finish up our sauce.
These are the red peppers, garlic, and spices that we put in the fridge.
I'm adding 3 tablespoons of mayo.
1/2 teaspoon of lime juice.
-Mmm!
-Yeah.
A little bit of brightness.
And 1/4 teaspoon of lime zest.
-Interesting.
-Yeah.
Really nice sauce.
Lots of flavors going on.
-Smoked paprika, cumin, roasted red peppers.
-Uh-huh.
Yeah.
-Lime juice.
-Okay.
Let's put this in a serving dish, and then we're gonna have ourselves a nice little okra party... [ Both laughing ] ...that I'm very much looking forward to.
See that nice browning that we got?
-Oh, yeah!
-Getting a little bit crispy on the edges.
Ooh.
-Like little okra fries.
-Yeah.
It doesn't have any of that slippery texture that you get when you cook it in a stew or something.
-Mm-hmm.
Mmm!
-Alright.
So I'll give you a little sauce, and then I'll give myself a little sauce, and then we can have our little party.
-[ Laughs ] -Party for two.
-Party for two.
Here.
Make sure you get a couple of super-crispy ones.
-Oh, the little guys?
-Yeah.
-This is the cutest little okra ever.
-Oh, I know.
They're adorable.
I can't believe how much they shrunk.
That was a lot of moisture in that okra.
-Mm-hmm.
-Oh, my goodness.
That's delicious.
-Mm-hmm.
-I've had them grilled before, but I've never had them roasted like this.
-Try one without the sauce, too, because even by itself, it's very satisfying.
You could just add a little squeeze of lime juice.
That's what I do sometimes.
-Oh, my goodness.
-Or just have them like this.
-I could eat a lot of these.
-I could -- I could probably eat the whole tray.
[ Both laugh ] For real.
-Oh, my goodness.
I like this as much as I like french fries.
-Mm-hmm, mm-hmm.
-I mean, they're delicious.
Mmm!
-So good, right?
-This is incredible.
Thank you.
-Mm-hmm.
-You're welcome.
-So if you want to give roasted okra a try, cut the okra in half and lay it cut-side down on the baking sheet, cover for the first 12 minutes of baking, and let the okra cool for five minutes before serving.
From "America's Test kitchen," the incredibly delicious roasted okra with spicy red-pepper mayonnaise.
You can get this recipe and all the recipes from this season, along with select episodes and our product reviews, on our website, americastestkitchen.com/tv.
♪♪ This is mind-blowingly good.
-Oh, I know.
-I'm eating three at a time.
-I noticed you grabbed multiples.
[ Both laugh ] Let us help you with dinner tonight.
Visit our website any time for the newest season's fail-proof recipes, full episodes, ingredient advice, and equipment reviews at AmericasTestKitchen.com/TV.
"The Complete America's Test Kitchen TV Show Cookbook" includes every recipe, taste test, and equipment review from all 24 years.
It's our most comprehensive cookbook.
The cost is $29.99.
That's 40% less than the cover price of $50.
To order, scan the QR code on your screen, or order online at AmericasTestKitchen.com/ Complete.
"America's Test Kitchen" is brought to you by the following.
Plugrà European-style butter was created for all chefs, cooks, and bakers.
Slow-churned with 82% butterfat for a smooth texture and more pliability for flaky crusts.
Plugrà -- from professional kitchens to your home.
Sailing with American Queen Voyages brings you to mighty rivers and unique expeditions, where passionate explorers can discover the continent of North America.
You can learn more about our voyages at AQVoyages.com or contact your travel advisor.
Sur la Table, where you can discover an assortment of provisions for your next meal or gathering, from cookware and tools from a wide variety of kitchen brands to hands-on cooking classes.
Visit us at surlatable.com.
♪♪ ♪♪ ♪♪ ♪♪ ♪♪ ♪♪


Support for PBS provided by:
America's Test Kitchen is presented by your local public television station.
Distributed nationally by American Public Television